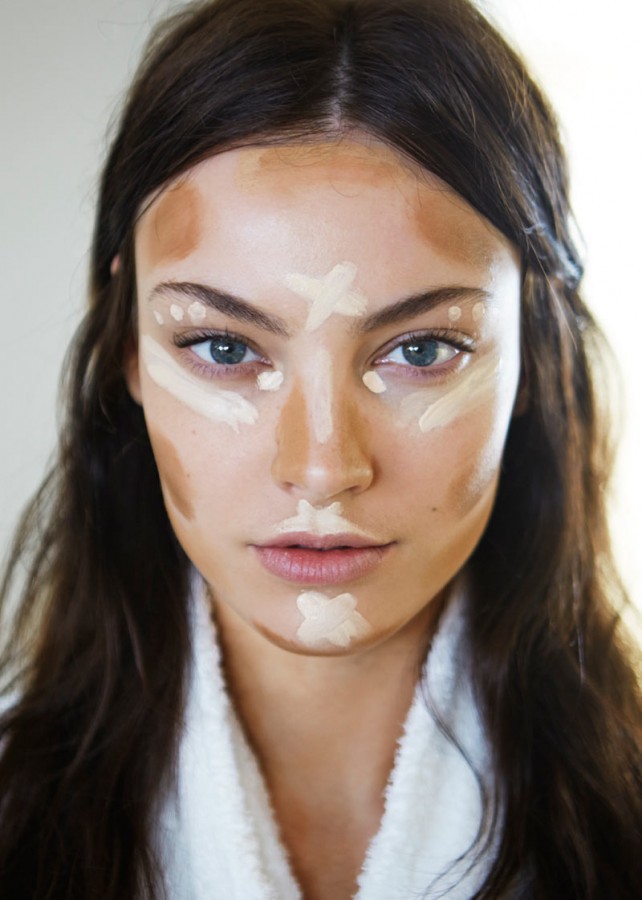
My make-up has always been pretty simple. I don't like to complicated myself by spending more than ten minutes on my face. One may think that that is too little time spent but I think that if the foundation is correct - everything else is easy-peasy. This picture below has brought my foundation face to a whole 'nother level. Showing where to contour and highlight to define your face and features perfectly.
ONE: The highlighter stick. This Yves Saint Laurent is my favorite. It feels light on the skin and doesn't cake on. Gives my face a pretty glow. As you can see in the above picture - the highlight is applied on more of the center of your face. Adding it under the eyes and brow really makes your eyes pop.
TWO: The contour stick. I enjoy using stick form because I feel it applies better but a powder will work just as well. This Nars Contour Stick is great. Same as the YSL - it doesn't cake on and blends well. The Contour stick is to define the face so applying it under the cheek bones and on the sides of your nose to contour the highlighted areas.
THREE: This cute little egg shaped tool is for blending the highlighter and contour into your skin. The better you blend the more natural your finished look will be. I add a spritz of water to my egg so that it helps blend without being rough on my face. It's a simple tool that will make all the difference. However - your fingers will work just as well. The warmth from your hands will help 'melt' the product into your skin so that it blends well. Just make sure you start with really clean hands so that you aren't blending anything icky into your skin.
SHOP THIS POST:


